Proper preparation of game is a key step in preserving the quality and lifelike appearance of the final mount. The better the animal is prepared before being handed over to the taxidermist, the better the final result will be. Below you’ll find practical advice on how to handle your trophy to minimize damage and ensure the best possible outcome.
- Quick field dressing and the first cuts
Once the animal is harvested, it’s important to field dress it as soon as possible to prevent contamination from internal organs. Gut contents can damage the skin and fur, complicating the taxidermy process. Key recommendations:
- Always perform a “small field dressing” (only removing vital organs, not the entire digestive tract).
- Keep all cuts as short as possible, whether you’re planning a shoulder mount or a full-body mount.
- After field dressing, allow the carcass to cool for at least two hours before skinning. Never let the animal cool while lying on the ground – the side touching the ground can overheat and spoil. Always hang it to cool.
- Small mammals do not need to be gutted. Just hang them, allow them to cool, and freeze them. If freezing is not possible, make a short abdominal incision, remove the organs, and deliver the carcass to the taxidermist as quickly as possible – ideally chilled.
- Birds should be hung by the beak (using a soft wire or string through the nostrils) or by the legs – never by the neck.
- If you intend to have your game mounted, never cut open the jaw just to check the teeth!
- Proper handling and transportation
Rough handling can result in bruises, broken bones or damaged feathers and fur. To avoid these issues:
- Handle game gently and avoid dragging it across the ground.
- Wrap the animal in a clean material (e.g. a cotton sack) to prevent dirt and contamination.
- Keep the carcass away from mud or standing water to protect the hide and coat.
- Skinning the animal correctly
Proper skinning is crucial for maintaining the integrity of the hide and enabling accurate mounting. Poor skinning can deform the skin and make the taxidermist’s work significantly harder. Here are general guidelines based on the type of mount:
- Full-body mount: All anatomical details must be preserved. Never cut or remove any parts unnecessarily. Follow the pattern shown in illustration 1.
- Shoulder or shoulder+brisket mount: Skin only to the shoulder area, ensuring enough excess hide for mounting. The main incision should start behind the head, run along the spine to behind the shoulders, and then circle the body. Never make incisions in front of the shoulders. See illustration 2.
- Birds and small animals: These require delicate handling to prevent feather loss or fur damage. There’s usually no need to gut or skin them – simply chill and freeze the whole animal in a plastic bag.
- Rugs: Skin as if preparing for a full-body mount. Use the same cut pattern as in illustration 1.
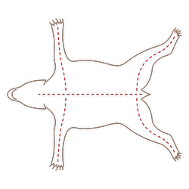 | 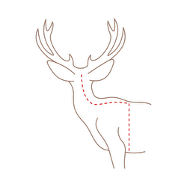 | |
| illustration 1 | illustration 2 |
Try to follow the incision patterns as closely as possible (see diagrams).
Be mindful not to manipulate the fur too much while skinning, as it can lead to shedding or damage. The skin should be handled according to the species and the intended final mount. Always clean the skin and fur of any blood or dirt using cold, clean water.
- Preserving and storing the hide
If the hide can’t be delivered to the taxidermist immediately, it must be stored properly:
- Salting: Apply a generous layer of fine, non-iodized salt to pull out excess moisture and prevent decomposition.
- Freezing: If immediate delivery isn’t possible, freeze the salted hide in a plastic bag with as much air removed as possible. In an emergency, you can freeze the hide unsalted, but it must stay completely frozen until delivered.
For birds, you can slide the animal headfirst into a nylon stocking before placing it in plastic – this keeps the feathers flat and protected. Stuffing a bit of cotton or tissue paper into the beak and cloaca also prevents contamination from bodily fluids during freezing.
Avoid the following:
- Don’t transport fresh hides wet or wrapped in plastic – this causes spoilage, slippage, and hair/feather loss.
- Be thorough when salting delicate areas such as the eyes, ears, nostrils, and lips – use plenty of salt.
- Never allow hides to thaw and refreeze.
- If freezing is not an option, deliver the animal to your taxidermist as soon as possible – at least chilled.
- When shipping via courier, the specimen must be thoroughly frozen and properly insulated. Notify your taxidermist in advance of any shipment.
- Specifying the taxidermy project
Before you hand over your game, make sure you’ve clarified the following:
- Do you want a full-body mount or just the head and shoulders?
- What pose do you prefer – relaxed or dynamic (e.g., predator with prey, two males fighting)?
- Which direction should the animal face?
- Are there any special details you want to include (e.g., closed or open mouth, custom base)?
The clearer the brief, the better the taxidermist can tailor the final product to your expectations.
Summary
Proper game preparation is essential for achieving a top-quality mount. Careful field dressing, gentle handling, precise skinning, and appropriate preservation methods all play a vital role.
A well-defined order with clear specifications ensures that your taxidermy will be exactly how you envisioned it – a lasting and lifelike tribute to a unique experience.
All educational articles
How to properly prepare an animal for taxidermy
Practical tips for hunters to ensure the best possible result.
Modern Methods in Taxidermy
Innovation, technology and new approaches in our field.
Myths about taxidermy
What People Say About Taxidermy — and What’s Actually True
Step-by-step preparation process
A detailed guide to the individual stages of trophy processing.
Mount care
How to Preserve Your Trophy for Years to Come.
Common mistakes when handling a trophy
What not to do to keep your trophy in perfect condition for long time.
The History of Taxidermy
From ritualistic forms of animal preservation to modern art and science.